P.2 Simulating Control Systems Using MATLAB
In this appendix we will show how to simulate the feedback control of
a dynamic system using MATLAB’s object-oriented class
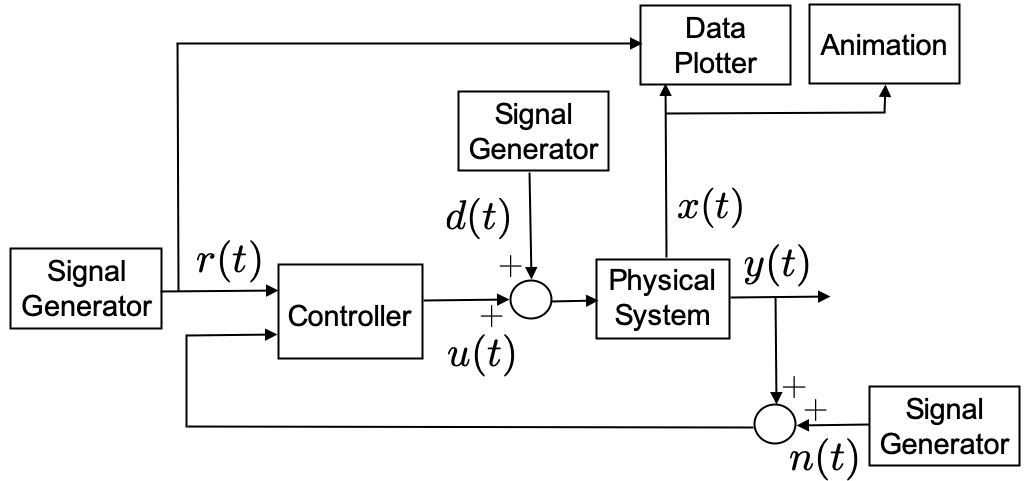
structure. Consider the general feedback control system shown in
Figure 2.1. The output
of the physical system is \(y(t)\), and
the inputs to the physical system are \(u(t)\) and an external disturbance signal
\(d(t)\). The output of the system
\(y(t)\) is corrupted by zero-mean
noise \(n(t)\). The input to the
controller is the reference signal \(r(t)\) as well as the output corrupted by
noise. In MATLAB, each block shown in
Figure 2.1 can be
implemented using a MATLAB class.
We will illustrate how to implement feedback control systems in
MATLAB by simulating the physical system described by the
differential equation \[\tag{P.2.1}
\ddot{y} + 2\dot{y} + 3 y = 4 u,\] and using the PID controller
\[\tag{P.2.2}
u(t) = k_p (r(t)-y(t)) + k_i \int_{-\infty}^t (r(\tau)-y(\tau))d\tau -
k_d \dot{y}.\]
The feedback control system shown in
Figure 2.1 is simulated
in systemSim.m, which is listed below.
t_start = 0;  % start time
t_end = 20;  % end time
t_plot = 0.1;  % sample rate for plotter and animation
Ts =0.01;  % sample rate for dynamics and controller

% instantiate system, controller, and reference classes
system = systemDynamics(Ts);
controller = systemController(Ts);
reference = signalGenerator(0.5, 0.05);
disturbance = signalGenerator(1.0, 0.0);
noise = signalGenerator(0.01);

% instantiate the data plots and animation
dataPlot = dataPlotter();
animation = systemAnimation();

% main simulation loop
t = t_start;  % time starts at t_start
y = system.h();  % system output at start of simulation
while t < t_end
    % set time for next plot
    t_next_plot = t + P.t_plot;
    % updates control and dynamics at faster simulation rate
    while t < t_next_plot
        r = reference.square(t);  % assign reference
        d = disturbance.step(t);  % simulate input disturbance
        n = noise.random(t);  % simulate noise
        u = controller.update(r, y + n);  % update controller
        y = system.update(u+d);  % Propagate the dynamics
        t = t + Ts; % advance time by Ts
    end
    % update animation and data plots
    animation.update(system.state);
    dataPlot.update(t, r, system.state, u);
end
The physical system is implemented in a class contained in
systemDynamic.m, which will be discussed below, and which
is instantiated on line 7. The system is updated at sample rate \(T_s\) given the control input \(u\) and the input disturbance \(d\) on line 29.
The controller is implemented in a class contained in
systemController.m, which will be discussed below, and
which is instantiated on line 8. Given the reference input \(r\), and the system output \(y\), the controller is updated at the fast
sample rate \(T_s\) on line 28. At the
initial time, the controller needs the initial output at time \(t=0\), which is computed on line 19 before
the main loop begins.
The reference input is implemented using the
signalGenerator class that is contained in
signalGenerator.m, which is described below, and which is
instantiated on line 9. The reference input at time \(t\), i.e., \(r(t)\), is assigned a value on line 25.
The external disturbance \(d(t)\) is
also implemented using the
signalGenerator class and is instantiated on line 10 and
assigned a value on line 26. For this example, the external disturbance
will be a constant value of \(d(t)=1.0\). The noise \(n(t)\) is also implemented using the
signalGenerator class and is instantiated on line 11 and
assigned a value on line 27.
In addition to the feedback loop as implemented above, the system
will be visualized through an animation, and also by plotting important
variables like the reference input, the system states, and the control
input. The animation and data plotting functions are implemented in
systemAnimation.m and
dataPlotter.m, which are instantiated on lines 14–15, and
updated on lines 33–34.
P.2.1 System Dynamics
This section will describe how to implement the system dynamics given in Equation P.2.1. The first step is to convert the dynamics to the state-space form \[\begin{aligned} \dot{x} &= f(x, u) \\ y &= h(x,u). \end{aligned}\] For the differential equation in Equation P.2.1 let \(x = (y, \dot{y})^\top\), which gives \begin{align} \dot{x}& = \begin{pmatrix} \dot{x}_1 \\ \dot{x}_2 \end{pmatrix} = \begin{pmatrix} \dot{y} \\ \ddot{y} \end{pmatrix} = \begin{pmatrix} \dot{y} \\ -2\dot{y} - 3y + 4u \end{pmatrix} = \begin{pmatrix} x_2 \\ -2x_2 - 3 x_1 + 4 u \end{pmatrix} \stackrel{\triangle}{=}f(x,u) \tag{P.2.3} \\ y &= x_1 \stackrel{\triangle}{=}h(x). \tag{P.2.4} \end{align}
The dynamics of the system are implemented in
systemDynamics.m, which is listed below.
classdef systemDynamics < handle
    properties
        state
        Ts
        limit
        a0
        a1
        b0
    end
    methods
        %---constructor-------------------------
        function self = systemDynamics(sample_rate)
            y0 = 0;  % initial condition for y
            ydot0 = 0;  % initial condition for ydot
            self.state = [...  % initial state
                        y0;...
                        ydot0;...
                        ];
            self.Ts = sample_rate;
            self.limit = 1.0;  % saturation limit
            % system parameters
            self.a0 = 3.0;
            self.a1 = 2.0;
            self.b0 = 4.0;
            % modify the system parameters by random value
            alpha = 0.2;  % Uncertainty parameter
            self.a0 = self.a0 * (1+2*alpha*rand-alpha);
            self.a1 = self.a1 * (1+2*alpha*rand-alpha);
            self.b0 = self.b0 * (1+2*alpha*rand-alpha);
        end

        function xdot = f(self, state, u)
            % Return xdot = f(x,u)
            y = state(1);
            ydot = state(2);
            % The equations of motion.
            yddot = -self.a1 * ydot - self.a0 * y + self.b0 * u;
            % build xdot and return
            xdot = [ydot; yddot];
        end

        function y = h(self)
            % y = h(x)
            y = self.state(1);
        end

        function y = update(self, u)
            % This is the external method that takes input u
            % and returns output y.
            u = self.saturate(u, self.limit);  % saturate input
            self.rk4_step(u);  % propagate state by one time step
            y = self.h();  % compute the output at current time
        end

        function self = rk4_step(self, u)
            % Integrate ODE using Runge-Kutta-4 algorithm
            F1 = self.f(self.state, u);
            F2 = self.f(self.state + self.Ts/2*F1, u);
            F3 = self.f(self.state + self.Ts/2*F2, u);
            F4 = self.f(self.state + self.Ts*F3, u);
            self.state = self.state...
                + self.Ts/6 * (F1 + 2*F2 + 2*F3 + F4);
        end

        function out = saturate(self, in, limit)
            if abs(in) > limit
                out = limit * sign(in);
            else
                out = in;
            end
        end

    end
end
In MATLAB, the class definition
classdef systemDynamics < handle must contain
< handle to ensure that internal methods can modify the
class properties. The internal properties are specified in lines 2–9.
The class methods are specified in lines 10–66. The class constructor is
given in lines 12–30 and is called when a class object is instantiated.
The state is initialized on lines 13–18 based on the initial conditions
for \(y(0)\) and \(\dot{y}(0)\). The system parameters are
initialized in lines 21–29. The parameters for any physical system are
never known exactly. Therefore, feedback systems need to be designed to
be robust to this uncertainty. In the simulation, we model uncertainty
in our knowledge of the physical parameters by changing the nominal
value by a uniform random variable. Let \(\alpha\) be the amount of change allowed
for each parameter. For example, \(\alpha =
0.2\) means that the physical parameters may change by up to 20%.
The function rand() returns a uniform random variable in
the interval \([0, 1]\). Therefore,
\((1 + \alpha
(2*\texttt{np.random.rand()}-1))\) is a random variable in the
interval \([-\alpha, \alpha]\). The
nominal values for the physical parameters that are known to the
designer are specified in lines 22–24. The actual values used by the
simulation are randomly selected in lines 27–29.
The system dynamics \[\begin{aligned} \dot{x} &= f(x, u) \\ y &= h(x, u). \end{aligned}\] are specified in lines 32–45. Lines 32–40 define \(f(x,u)\), and lines 42–45 define \(h(x, u)\), as given by Equations P.1.3 and P.1.4 respectively.
The main feedback loop calls the update method on
lines 47–53. The update function first saturates the input
on line 50, where the saturation function is defined in
lines 64–70. The system dynamics are then propagated forward by one
sample time \(T_s\) using the
fourth-order Runge-Kutta algorithm on line 51, where the RK4 algorithm
is specified on lines 55–62, as described in
Appendix 28. The update
function finally computes and returns the output \(y\) on line 52.
P.2.2 Controller
This section will describe how to implement the PID controller given
in Equation P.2.2. The
controller is implemented in systemController.m, which is
listed below.
classdef systemController
    properties
        kp
        kd
        ki
        Ts
        sigma
        beta
        limit
        ydot
        y_d1
        integrator
        error_d1
    end
    methods
        %------constructor----------------------
        function self = systemController(sample_rate)
            % specify gains
            self.kp = 1.0;
            self.kd = 1.0;
            self.ki = 1.0;
            self.Ts = sample_rate;
            self.sigma = 2.0 * self.Ts;
            self.beta = (2.0*sigma-self.Ts)/(2.0*sigma+self.Ts);
            self.limit = 1.0;
            % internal storage for differentiator
            self.ydot = 0.0;
            self.y_d1 = 0.0;
            % internal storage for integrator
            self.integrator = 0;
            self.error_d1 = 0;
        end

        function u = update(self, r, y)
            e = r - y;  % define the error
            I = self.integrate_e(e);  % integrate error
            ydot = self.differentiate_y(y);  %differentiate y
            % form PID controller, saturate, and return
            u = self.kp * e + self.ki * I - self.kd * ydot;
            u = self.saturate(u);
        end

        function I = integrate_e(self, error)
            self.integrator = self.integrator...
                + (self.Ts / 2) * (error + self.error_d1);
            self.error_d1 = error;
            I = self.integrator;
        end

        function ydot = differentiate_y(self, y)
            self.ydot = self.beta*self.ydot...
                + (1-self.beta)/self.Ts * (y - self.y_d1);
            self.y_d1 = y;
            ydot = self.ydot;
        end

        function out = saturate(self, in):
            if abs(in) > self.limit
                out = self.limit * sign(u);
            else
                out = in;
            end
        end

    end
end
The controller properties are specified on lines 2–14 and
instantiated in the constructor on lines 17–32. The PID gains are
specified on lines 19–21. The sample rate of the controller is passed
into the system at the time of instantiation and is assigned an internal
variable \(T_s\) in line 9. The dirty
derivative gain \(\sigma\), described
in
Chapter 13, is specified on
line 22, and the intermediate gain \(\beta =
\frac{2\sigma-T_s}{2\sigma+T_s}\) is specified on line 24.
Internal storage variables for the differentiator and the integrator, as
explained in
Chapter 13, are given in
lines 27–31. The PID control update routine is specified in
lines 34–41. The error \(e=r-y\), as
shown in
Figure 2.1, is defined
on line 35. The PID controller in
Equation P.2.2 uses
the integral of \(e\) and the
derivative of \(y\). The integral of
\(e\) is computed on line 36 using the
routine specified on lines 43–48. A derivation of the integral equations
is given in
Chapter 13. The derivative
of \(y\) is computed in line 37 using
the routine specified in lines 50–53. A derivation of the dirty
derivative equations is given in
Chapter 13. Finally, the
PID controller is computed, the value is saturated, and the result is
returned on lines 39 and 40.
P.2.3 Signal Generator
MATLAB code for the signal generator class is listed below.
classdef signalGenerator
    %   produces: square_wave, step, sawtooth_wave,
    %             random_wave, sin_wave.
    properties
        amplitude
        frequency
        y_offset
    end
    methods
        %---constructor--------------------------------
        function self = signalGenerator(...
                amplitude, frequency, y_offset)
            self.amplitude = amplitude;
            if nargin>1
                self.frequency = frequency;
            else
                self.frequency = 1;
            end
            if nargin>2
                self.y_offset = y_offset;
            else
                self.y_offset = 0;
            end
        end

        function out = square(self, t)
            if mod(t, 1/self.frequency)<=0.5/self.frequency
                out = self.amplitude + self.y_offset;
            else
                out = -self.amplitude + self.y_offset;
            end
        end

        function out = step(self, t)
            if t>=0
                out = self.amplitude + self.y_offset;
            else
                out = 0;
            end
        end

        function out = sawtooth(self, t)
            out = 4*self.amplitude*self.frequency...
                * mod(t, 0.5/self.frequency)...
                - self.amplitude + self.y_offset;
        end

        function out = random(self, t)
            out = sqrt(self.amplitude)*randn + self.y_offset;
        end

        function out = sin(self, t)
            out = self.amplitude*sin(2*pi*self.frequency*t)...
                + self.y_offset;
        end
    end
end
The class is instantiated by passing in the desired amplitude of the signal, the frequency in Hertz, and a y-offset value. For random signals, the amplitude is interpreted to be the standard deviation of the signal. The signal generator can then be used to produce a square wave, a sawtooth signal, a step, a random signal, or a sinusoid, as specified in lines 26–55.
P.2.4 Data Plotter
The objective of the data plotter is to plot the relevant signals during the simulation. For this simple example, we will plot the output \(y\) and the reference \(r\) on one plot, the velocity \(\dot{y}\) on another plot, and the control signal \(u\) on a third plot. MATLAB code for the data plotter class is listed below.
classdef dataPlotter < handle
    properties
        % data histories
        time_history
        r_history
        y_history
        ydot_history
        u_history
        index
        % figure handles
        r_handle
        y_handle
        ydot_handle
        u_handle
    end
    methods
        %--constructor--------------------------
        function self = dataPlotter(P)
            % Instantiate lists to hold the time and data histories
            self.time_history...
                = NaN*ones(1,(P.t_end-P.t_start)/P.t_plot);
            self.r_history...
                = NaN*ones(1,(P.t_end-P.t_start)/P.t_plot);
            self.y_history...
                = NaN*ones(1,(P.t_end-P.t_start)/P.t_plot);
            self.ydot_history...
                = NaN*ones(1,(P.t_end-P.t_start)/P.t_plot);
            self.u_history...
                = NaN*ones(1,(P.t_end-P.t_start)/P.t_plot);
            self.index = 1;
            % Create figure and axes handles
            figure(2), clf
            subplot(311)
                hold on
                self.r_handle...
                    = plot(self.time_history,...
                           self.r_history, 'g');
                self.y_handle...
                    = plot(self.time_history,...
                           self.y_history, 'b');
                ylabel('y')
                title('System Data')
            subplot(312)
                hold on
                self.ydot_handle...
                    = plot(self.time_history,...
                           self.ydot_history, 'b');
                ylabel('ydot')
            subplot(313)
                hold on
                self.u_handle...
                    = plot(self.time_history,...
                           self.u_history, 'b');
                ylabel('u')
        end

        function self=update(self, time, reference, states, control)
            % update the time history of all plot variables
            self.time_history(self.index) = time;
            self.r_history(self.index) = reference;
            self.y_history(self.index) = states(1);
            self.ydot_history(self.index) = states(2);
            self.u_history(self.index) = control;
            self.index = self.index + 1;
            % update the plots with associated histories
            set(self.r_handle,...
                'Xdata', self.time_history,...
                'Ydata', self.r_history)
            set(self.y_handle,...
                'Xdata', self.time_history,...
                'Ydata', self.y_history)
            set(self.ydot_handle,...
                'Xdata', self.time_history,...
                'Ydata', self.ydot_history)
            set(self.u_handle,...
                'Xdata', self.time_history,...
                'Ydata', self.u_history)
        end
    end
end
The plotter constructor is listed on lines 18–55. Lines 20–29
initialize arrays that will hold the data histories. Allocating memory
for the arrays upon initialization speeds up the run-time execution of
the data plotter. Lines 32–54 set up the plot window with three subplots
and plot the initial data. The MATLAB plot routine returns
a MATLAB handle to the line, which is a data structure that
contains all data associated with each line. The first subplot (311)
will plot \(r(t)\) in green
(’g’), and \(y(t)\) in
blue (’b’). The second subplot (312) will plot \(\dot{y}\) in blue, and the third subplot
(313) will plot \(u(t)\) in blue.
The update method receives as input the current
time,
reference, state, and control
values. Lines 59–63 append the current values to their histories. The
plots are then updated with the new histories in lines 66–77 by calling
the set routine and passing in the associated
handle.
P.2.5 Animation
In this section we will show how to create an animation for the inverted pendulum case study. Consider the image of the inverted pendulum shown in Fig. 2.2, where the configuration is completely specified by the position of the cart \(z\) and the angle of the rod from vertical \(\theta\). The physical parameters of the system are the rod length \(\ell\), the base width \(w\), the base height \(h\), and the gap between the base and the track \(g\).
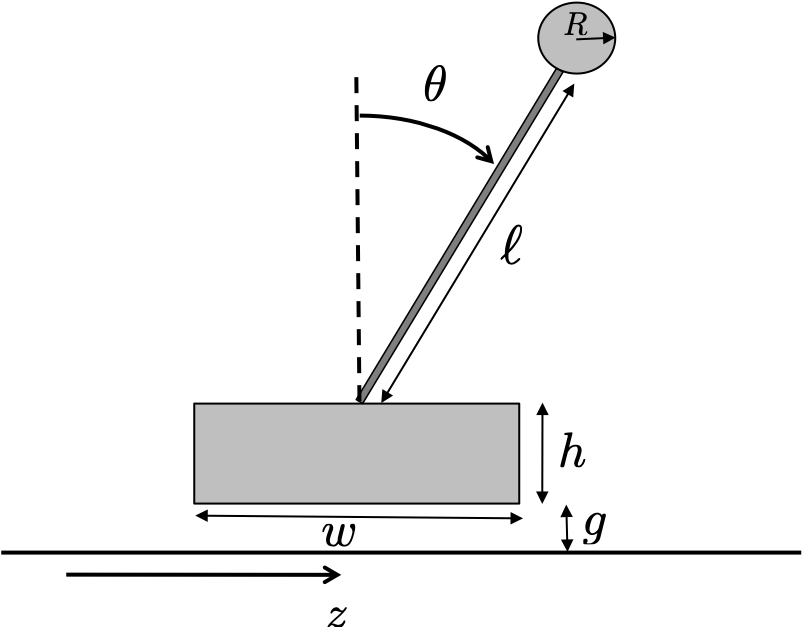
The first step in developing the animation is to determine the position of points that define the animation. The pendulum will require that we draw three objects: the rectangular cart, the circular bob at the end of the rod, and the rod. We will draw the cart as a rectangle, the bob as a circle, and the rod as a line. In MATLAB, rectangles are specified by their corners. The four corners of the rectangle are given by \[C = \begin{bmatrix} z-w/2, & g \\ z_w/2, & g \\ z+w/2, & g+h \\ z-w/2, & g+h \end{bmatrix}.\] In MATLAB, lines are specified by the \(x\) and \(y\) locations of their endpoints. The \(x\) locations of the endpoints of the rod are \(X=[z, z+\ell\sin\theta]\), and the \(y\) locations of the endpoints are \(Y=[g+h, g+h+\ell\cos\theta]\). In MATLAB, circles are drawn as a sequence of small line segments that must be specified by their \(x\) and \(y\) locations. The center of the bob is given by \(C = (z+(\ell+R)\sin\theta, g+h+(\ell+R)\cos\theta)\), and so points on the edge of the bob will be given by \(X = [C_x + R\cos\theta]\) and \(Y=[C_y + R\sin\theta]\). MATLAB code for the animation class is listed below.
The pendulumAnimation class is initialized on
lines 14–32. Lines 15–19 set all of the plot parameters based on data
passed through the structure P. Line 21 initializes the
plot window and line 23 draws the ground track, which will not change
during the animation. Lines 26–28 draw the base, bob, and line for the
first time, and a MATLAB handle is returned for each object
in the animation. Line 30 sets the plot axes, and line 31 labels the
plot.
The animation function is updated each time step using the
update method on lines 34–42. The input to the
update method is the state of the pendulum, of
which the first element is \(z\) and
the second element is \(\theta\)
(lines 36–37). Lines 38–40 then call methods that will be described
below and that draw the cart, rod, and bob. Line 41 forces MATLAB to
update the animation at each time step.
The draw_cart method is listed on lines 44–56. The cart
is drawn using the fill routine, where the \(x\) and \(y\) locations of each corner must be
specified, as shown on lines 46–49. The first time
draw_cart is called, the cart_handle will not
exist, and so it is created through a call to fill on
line 52. Upon subsequent calls to draw_cart, the handle
will exist and so the cart location is updated through the
set command on line 54. Since the \(y\) data of the cart does not change with
time, only the \(x\) data is
updated.
The draw_rod method is listed on lines 58–71. The rod is
drawn using the plot routine, where the \(x\) and \(y\) locations of the ends of the rod must
be specified, as shown on lines 60–64. The first time
draw_rod is called, the rod_handle will not
exist, and so it is created through a call to plot on
line 67. Upon subsequent calls to draw_rod, the handle will
exist and so the rod points are updated through the set
command on line 69. Note that both the \(x\) and the \(y\) data of the rod must be updated at each
time step.
The draw_bob method is listed on lines 73–90. The bob is
drawn using the fill routine, where the \(x\) and \(y\) locations of each point on the bob must
be specified. The points are parameterized by \(\vartheta\), which ranges from zero to
\(2\pi\). Line 74 establishes an array
of \(N=10\) angle points. The center of
the bob is specified on lines 76–79, and the \(x\) and \(y\) points along the outline of the bob are
given on lines 81–82. The first time draw_bob is called,
the bob_handle will not exist, so it is created through a
call to fill on line 85. Upon subsequent calls to
draw_bob, the handle will exist, so the bob location is
updated through the set command on lines 87–88. Note that
both the \(x\) and the \(y\) data of the bob must be updated at each
time step.